
In the Gas Formula Builder window (accessed by clicking the Gas Formula Builder button1) you define the formula(s) that can be then be used in calculating the price per unit of a gas formula swap. You do this in the Formula area of the window.
You create a gas formula using the following elements or building blocks–parameters and (optionally) sub formulas.
It is important to note that in order to be able to add a parameter or a sub formula to a gas formula, these elements must first be predefined in the system. This is done in the Parameters and Sub Formulas areas respectively, either by yourself or by any other user in your company.
Once created (and displayed in the Gas Formula Builder window) these elements can be used in the current formula. However, if you also save them, they can then also be used in the future by any user in your company as shortcuts to let you easily insert frequently used elements into future gas formulas.
It is important to note that:
In order to be able to use a parameter or sub formula in the gas formula (i.e., in the Formula area), the parameter or sub formula must first be displayed on the page in the relevant area, i.e., the Parameters area and the Sub Formulas area. That is, you must either create a new element, or open an existing element, before you can add it to the current gas formula.
Once you have added a new element, if you want it to be available in the future and for other users, then you must save it to the system by clicking the Save Selected button. However, even if you don't save it, as long as it is displayed in the page then you can still use it in the formula you are currently creating. Moreover, once you have saved the formula, when you access this formula in the future you will still see this element in the relevant area, i.e., the Parameters area or the Sub Formulas area (even though you will not be able to access it via the relevant Folders icon).
Any user can access all parameters and sub formulas saved by any other user in the same company.
In the Gas Formula Builder window you can:
Work with multiple parameters
Work with multiple sub formulas
Work with a single gas formula
To use a parameter in the actual gas formula, it must first be displayed in the Parameters area. You create new parameters and work with existing ones in the Parameters area.
In the Parameters area you can:
Add a new parameter
Edit an existing parameter
Test your parameters using the Example Gas Term field.
Remove an existing parameter
Save parameters to the system
There are six types of parameters available as follows:
Constant
This parameter simply defines a constant. It must be a number.
Conversion factor
This parameter defines the amount that lets the system know how to convert a unit of the price component (e.g., tons) to a unit of the gas price formula (e.g., MWh). It must be a number.
This parameter is calculated to be the average (this can be set to the daily average or the monthly average) of the daily FX spot rates for a defined currency pair over a specified observation period, which is always defined relative to the start of a given period.
You might use this parameter for example if the price components are denominated in another currency than the currency of the gas price formula. For example, you have included a Commodity parameter based on Brent Crude Oil (which is priced in USD) and the currency of the gas price formula is EUR.
The scope of the observation period is defined in months in the Obs textbox, and the end date of the observation period is defined to fall a certain number of months from the start of the given period using the Lag textbox. So if you set the lag to -1, the end date of the observation period is set to the end date of the given period; if you set the lag to 0, the end date of the observation period is set to the end date of the month before the given period's start date, etc. You can also set the observation period to match the given period itself by defining a negative lag.
In the example shown in See "FX Rate Average Parameter in a Gas Formula " the system will take the average EUR/USD spot rate over a 4-month period that ends a month before the start of the swap. So if the swap starts on 1 September 2009 (as seen in the Begin Date field), the observation period will be between 1 April-30 July 2009.
Figure 1: FX Rate Average Parameter in a Gas Formula
FX Rate
This parameter is defined as the FX spot rate on a specified day in a specified month relative to the start of the swap. You define the specified day from a dropdown list where you can choose any of the following dates:
Beginning of month
End of month
Other (this is not currently supported)
To define the actual month you use the Lag textbox, where you define the month by its distance from the start of the gas term. You can also set the period to match the gas term defined for the gas formula swap itself by defining a negative lag.
In the example shown in See "FX Rate Parameter in a Gas Formula " the system will take the EUR/USD sport rate on the first day of the month that ends 2 months before the start of the swap. So if the swap starts on 1 September 2009, the FX spot rate will be taken from 1 June 2009.

Figure 2: FX Rate Parameter in a Gas Formula
You might use this parameter for example if the price of the one or more of the underlying components is denominated in a currency other than the currency of the gas price formula. For example, you have included a Commodity parameter based on Brent Crude Oil (which is priced in USD) and the currency of the gas price formula is EUR.
Interest Rate
This instructs the system to input the IR interest rate for a defined currency and a defined tenor on a specified day in a specified month relative to the start of the swap. You define the specified day from a dropdown list where you can choose any of the following dates:
Beginning of month
End of month
Other (this is not currently supported)
To define the actual month you use the Lag textbox, where you define the month by its distance from the start of the gas term. You can also set the period to match the gas term defined for the gas formula swap itself by defining a negative lag.
In the example shown in See "Interest Rate Parameter in a Gas Formula " the system will take the 3M USD interest rate on the first day of the month that ends immediately prior to the start of the swap. So if the swap starts on 1 September 2009, the IR interest rate will be taken from 1 August 2009.

Figure 3: Interest Rate Parameter in a Gas Formula
This instructs the system to input the average (this can be set to the daily average or the monthly average) of the daily fixings for a defined commodity over a specified observation period, which is always defined relative to the start of a given period.
The scope of the observation period is defined in months in the Obs textbox, and the end date of the observation period is defined to fall a certain number of months from the start of the given period using the Lag textbox. So if you set the lag to -1, the end date of the observation period is set to the end date of the given period; if you set the lag to 0, the end date of the observation period is set to the end date of the month before the given period's start date, etc. You can also set the observation period to match the given period itself by defining a negative lag.
In the example shown in See "Interest Rate Parameter in a Gas Formula " the system will take the average of the Gasoil 0.1% FOB ARA fixing rate over a 1-month period that ends a month before the start of the swap. So if the swap starts on 1 September 2009, the observation period will fall over 1-30 July 2009.

Figure 4: Commodity Parameter in a Gas Formula
Defining a given period for the FX Rate Average parameter & Commodity parameter
Unlike the FX Rate parameter and the Interest Rate parameter, where the given period is always set to the gas term, for the FX Rate Average parameter and the Commodity parameter the given period (relative to which the observation period is calculated) does not have to be limited to the single month of the gas term itself.
Indeed, for these two parameters the given period can be defined as one of a number of supported periods, including a one-month period (i.e., the period of the gas term itself), a bi-monthly period, a quarterly period, etc.
To define this period, you simply select the relevant period from the dropdown list as seen in See "Defining a Period for the FX Rate Average Parameter and Commodity Parameter ".
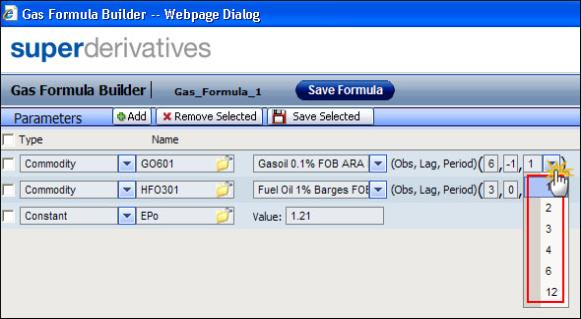
Figure 5: Defining a Period for the FX Rate Average Parameter and Commodity Parameter
However, you must take into account the fact that for each defined period, e.g., 6m (bi-annually) or 3m (quarterly), there are a number of options within any single year–.e., if you select 6m it could be Jan - Jun or Jul - Dec; if you select 2m, it could be Jan - Feb, Mar - Apr, May - Jun, etc. Accordingly, the exact period used also depends on which gas term you define. So if you set the given period to be a quarterly period (3m) and you set the gas term to June, the system first divides the year into 4 groups of 3 (i.e., Jan - Mar, Apr - Jun, Jul - Sep, Oct - Nov) and it then uses the dates of the group in which the defined gas term falls, i.e., the Apr - Jun group. So the defined period will be 1 Apr - 30 Jun. It then calculates the observation period (using the lag definition) relative to the dates of that defined period.
In the system for the FX Rate Average parameter or the Commodity parameter you can select any of the following supported given periods:
A one-month period, i.e., 1
This sets the given period to that of the gas term itself. This is still the default setting.
A two-month period, i.e., 2
So if the gas term is set to Dec12, the given period will be 1 Nov 2012 - 31 Dec 2012. Accordingly, if the observation period is set to 2 and the lag period is set to 0, the observation period will be set to 1 Sep 2012 - 31 Oct 2012.
A quarterly period, i.e., 3
So if the gas term is set to May12, the given period will be 1 Apr 2012 - 30 Jun 2012. Accordingly, if the observation period is set to 2 and the lag period is set to 0, the observation period will be set to 1 Feb 2012 - 31 Mar 2012.
A four-month period, i.e., 4
So if the gas term is set to Dec12, the given period will be 1 Sep 2012 - 31 Dec 2012. Accordingly, if the observation period is set to 2 and the lag period is set to 0, the observation period will be set to 1 Jul 2012 - 31 Aug 2012.
A semi-annual period, i.e., 6
So if the gas term is set to Aug12, the given period will be 1 Jul 2012 - 31 Dec 2012. Accordingly, if the observation period is set to 2 and the lag period is set to 0, the observation period will be set to 1 May 2012 - 30 Jun 2012.
An annual period, i.e., 12
So if the gas term is set to Dec12, the given period will be 1 Jan 2012 - 31 Dec 2012. Accordingly, if the observation period is set to 2 and the lag period is set to 0, the observation period will be set to 1 Nov 2011 - 31 Dec 2011.
Setting the Average Fixing Setting for the FX Rate Average parameter & Commodity parameter
For two of the parameters that you can use in the gas formula—the FX Rate Average parameter and the Commodity parameter—the system calculates the average of the daily fixing rates (i.e., the FX spot rate for a defined currency pair for the first parameter and the fixings for a defined commodity for the second parameter) over a specified observation period.
By default, for each of these parameters the system calculates the daily average of all the fixings over the entire observation period, as follows:
Sum of all the fixings in the observation period / no. of fixing days
However, you can instead choose to use the monthly average of the fixings over the observation period. In this method, the system first calculates the average of the fixings for each month in the observation period individually, and then it calculates the average of all these monthly results, as follows:
Sum of the average result for each month in the observation period / no. of months in the observation period
This method gives equal weight to each month in the observation period, regardless of the actual number of fixing dates in each month.
You choose between the two available weighting options using the dropdown list as seen in See "Choosing Between the Available Weighting Options ".
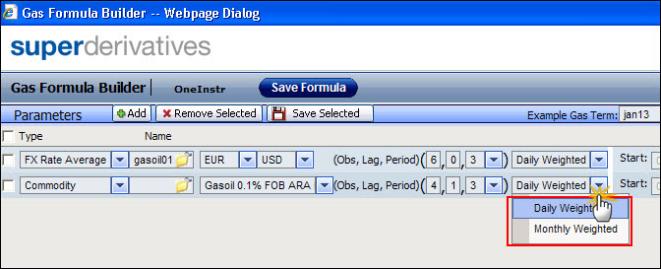
Figure 6: Choosing Between the Available Weighting Options
Note that:
If you use the Daily Weighted method, the system assigns an equal weight to each fixing, unless of course you have edited the weights of any of the fixings via the Fixing Details window.
If you use the Monthly Weighted method, the system must first calculate the average per month in the observation period. To calculate the average for each month, the system gives equal weight to each fixing date in that month, unless of course you have edited the weights of any of that month's fixings via the Fixing Details window.
Defining a negative lag To include the fixings from the given period (for the FX Rate Average and the Commodity parameters) or from the given gas term (for the FX Rate Average and the Commodity parameters), rather than the fixings from a period prior to the given period or gas term, you can define a negative lag, i.e., -1. A lag of -1 means that the fixings are based on a period that matches the given period or the gas term as relevant.
So as seen in the example in See "Defining a Negative Lag for an FX Rate Average Parameter " for an FX Rate Average parameter the system will take the average EUR/USD spot rate over a 4-month period that ends at the end of the swap itself. So if the swap ends on 30 April 2011 (as seen in the End Date field), the observation period will be between 1 January-30 April 2011.

Figure 7: Defining a Negative Lag for an FX Rate Average Parameter
And as seen in the example shown in See "Defining a Negative Lag for an Interest Rate Parameter " for an Interest Rate parameter the system will take the 3M USD interest rate on the first day of the month that begins at the start of the swap itself. So if the swap starts on 1 April 2011, the IR interest rate will be taken from 1 April 2011.

Figure 8: Defining a Negative Lag for an Interest Rate Parameter
When adding a new parameter, you can define it from scratch or base it on an existing parameter.
To define it from scratch, simply type in a name for it in the Name textbox and populate the required fields, e.g., the Value field for a Constant type of parameter.
To base it on an existing parameter, after adding a new parameter as seen in See "Adding a New Parameter in the Gas Formula Builder " you can select an existing parameter of the type required by clicking the Folder icon in the Name textbox. The Folder icon lets you access all parameters already saved by all the users in your company.
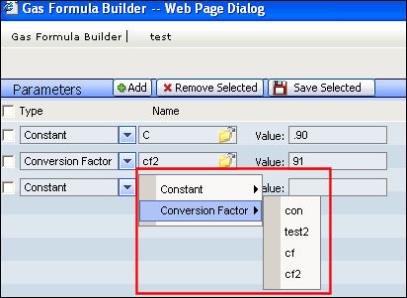
Figure 9: Adding a New Parameter in the Gas Formula Builder
|
|
If you base a new parameter on an existing parameter, it is advisable to give it a new name. Otherwise when you click the Save Selected button you will override the existing definition in the system. |
To add a new parameter:
| 1. | In the Parameters area click the Add button. By default a Constant type parameter is added to the list of parameters that can be used in the Formula area. |
| 2. | You can then define its type via the Type dropdown list and define its name and values according to the type selected. |
Alternatively, to base it on an existing parameter, in the Name textbox click the Folder icon and select an existing parameter. Edit its name and values as required.
Once a parameter is displayed in the list of parameters, you can edit it. You can change its type by selecting a different type from the Type dropdown list, change the displayed values, give it a different name, etc.
If you open the Gas Formula Builder for an existing formula, you can edit the displayed parameters. In addition, in the Gas Formula Builder window either for an existing formula or a new formula you can display any parameter saved in the system and then edit it.
If you edit the name of an existing parameter, when you click the Save Selected button the system will not edit the existing parameter but rather create a new one leaving the existing parameter as it was.
if you edit a parameter but do not save it to the system (by clicking the Save Selected button), if you then use the parameter in the formula its edited values (as displayed in the Parameters area) are used in the calculation, and not the values saved in the system. This means that parameters with the same name but different definitions may be used in different gas formulas.
To edit a displayed parameter:
| 1. | In the Parameters area edit the displayed parameter as required. You can edit its name, type, and any of the values. |
|
|
If you edit the name, when you click the Save Selected button the system will not edit the existing parameter but rather create a new one leaving the existing parameter as it was. |
| 2. | To save it into the system, check the parameter's checkbox. |
| 3. | Click the Save Selected button and then click OK. |
To edit an existing parameter that is not displayed:
| 1. | In the Parameters area click the Add button. By default a Constant type parameter is added to the list of parameters that can be used in the Formula area. |
| 2. | In the Name textbox click the Folder icon and select an existing parameter from one of the types listed (as seen in See "Editing an Existing Parameter in the Gas Formula Builder "). |

| Figure 10: | Editing an Existing Parameter in the Gas Formula Builder |
|
|
The existing parameters are stored according to type. You only see a dropdown list for each type for which parameters have already been saved into the system. |
| 3. | Edit the parameter as required. |
|
|
If you edit the name, when you click the Save Selected button the system will not edit the existing parameter but rather create a new one leaving the existing parameter as it was. |
You can test your parameter definitions by defining a gas term in the Example Gas Term field. Once you have defined the gas term, the system calculates the gas term's begin date and end dates, and then automatically displays the relevant fixing information for each of the parameters defined on the right-hand side of the window. The system calculates this information using both the defined gas term and the parameter definitions entered on the left-hand side of the window.
This lets you easily see if you have defined the parameters as you intended.
Furthermore, once the fixing information is displayed in the Gas Formula Builder window, any changes you then make to your parameter definitions on the left-hand side of the window are automatically reflected in the fixing information displayed on the right-hand side of the window. Similarly, if you manually change the fixing information displayed on the right-hand side of the window (including changing the gas term), the system will automatically update the parameter definitions themselves (the Freq, Obs and Lag fields as relevant). The latest parameter definitions displayed on the screen are the ones that will be used as relevant in the gas formula.
Defining the gas term You can define the Example Gas Term field manually, i.e., by entering any of the supported duration shortcuts in the Example Gas Term field. To see the list of supported duration shortcuts, click the i button next to the Example Gas Term field.
However, if you had already defined a gas term in the pricing page (again by entering a supported duration shortcut in the Gas Term field), by default that value appears in the Example Gas Term field when you next open the Gas Formula Builder window for an existing formula. If you open the Gas Formula Builder window for a new formula, the Example Gas Term field is empty, even if you defined a gas term in the pricing page.
Removing a parameter from the Parameter area does not remove it permanently from the system. That is, you can always display that same parameter again at a later stage. Instead, this action simply removes the selected parameter from the list of displayed parameters.
To remove a parameter:
| 1. | Check the checkbox next to the parameter you want to remove from the displayed list. |
| 2. | Click the Remove Selected button. The selected parameter is removed from the displayed list. |
Once you have added a new parameter or edited an existing parameter, if you want it to be available in the future for use in future gas formulas, and to be available for use by other users, then you must save it to the system. You do this using the Save Selected button.
If you don't save a new or edited parameter, you can still use it in the formula you are currently creating. Moreover, once you have saved the actual gas formula, when you access this formula in the future you will still see this parameter in the Parameters area (but you will not be able to access it via the Folders icon).
If you edit the name of an existing parameter, when you click the Save Selected button the system will not edit the existing parameter but rather create a new one leaving the existing parameter as it was.
To save a parameter into the system:
| 1. | In the Parameters area check the parameter's checkbox. |
| 2. | Click the Save Selected button and then click OK. |
To use a sub formula in the actual gas formula, it must first be displayed in the Parameters area.
In the Sub Formulas area you can:
Add a new sub formula
Edit an existing sub formula
Remove an existing sub formula
Save sub formulas to the system
When adding a new sub formula, you can define it from scratch or base it on an existing sub formula. It must of course follow the rules for defining a valid formula, as defined below in Working with Formulas.
To define it from scratch, simply type in a name for it in the Name textbox and fill in the Sub formula field.
To base it on an existing sub formula, after adding a new sub formula you select an existing sub formula by clicking the folder icon in the Name textbox. The folder icon lets you access all sub formulas already saved by all the users in your company.
|
|
If you base a new sub formula on an existing sub formula, it is advisable to give it a new name. Otherwise when you click the Save Selected button you will override the existing definition in the system. |
To add a new sub formula:
| 1. | In the Sub Formulas area click the Add button. |
| 2. | You can then define its name and definition. |
Alternatively, to base it on an existing sub formula, in the Name textbox click the Folder icon and select an existing sub formula. Edit its name and values as required.
|
|
If you edit the name, when you click the Save Selected button the system will not edit the existing sub formula but rather create a new one leaving the existing sub formula as it was. |
Editing an Existing Sub Formula
Once a sub formula is displayed in the list of sub formula, you can edit it.
If you open the Gas Formula Builder for an existing formula, you can edit the displayed sub formulas. In addition, in the Gas Formula Builder window either for an existing formula or a new formula you can display any sub formula saved in the system and then edit it.
If you edit a sub formula but do not save it to the system (by clicking the Save Selected button), if you then use the sub formula in the formula its edited values (as displayed in the Sub Formulas area) are used in the calculation, and not the values saved in the system. This means that sub formulas with the same name but different definitions may be used in different gas formulas.
To edit a displayed sub formula:
| 1. | In the Sub Formulas area edit the displayed sub formula as required. You can edit its name, type, and any of the values. |
|
|
If you edit the name, when you click the Save Selected button the system will not edit the existing sub formula but rather create a new one leaving the existing sub formula as it was. |
To edit an existing sub formula that is not displayed:
| 1. | In the Parameters area click the Add button. |
| 2. | In the Name textbox click the Folder icon and select an existing sub formula from the Formula dropdown list, as seen in See " Editing an Existing Sub Formula That Is Not Displayed ". |
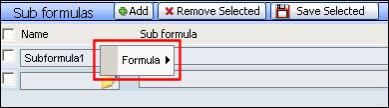
| Figure 11: | Editing an Existing Sub Formula That Is Not Displayed |
| 3. | Edit the sub formula as required. |
|
|
If you edit the name, when you click the Save Selected button the system will not edit the existing sub formula but rather create a new one leaving the existing sub formula as it was. |
| 4. | To save it into the system, check the sub formula's checkbox. |
| 5. | Click the Save Selected button and then click OK. |
Removing a sub formula from the Sub Formulas area does not remove it permanently from the system. That is, you can always display that same sub formula again at a later stage. Instead, this action simply removes the selected sub formula from the list of displayed sub formulas.
To remove a sub formula:
| 1. | Check the checkbox next to the sub formula you want to remove from the displayed list. |
| 2. | Click the Remove Selected button. The selected sub formula is removed from the displayed list. |
Once you have added a new sub formula or edited an existing sub formula, if you want it to be available in the future for use in future gas formulas, and to be available for use by other users, then you must save it to the system. You do this using the Save Selected button.
If you don't save a new or edited sub formula, you can still use it in the formula you are currently creating. Moreover, once you have saved the actual gas formula, when you access this formula in the future you will still see this sub formula in the Sub Formulas area (but you will not be able to access it via the Folders icon).
If you edit the name of an existing sub formula, when you click the Save Selected button the system will not edit the existing sub formula but rather create a new one leaving the existing sub formula as it was.
To save a sub formula into the system:
| 1. | In the Sub Formulas area check the sub formula's checkbox. |
| 2. | Click the Save Selected button and then click OK. |
In the Gas Formula Builder window you can create a new formula or edit an existing one.
A formula can contain any of the displayed parameters, any of the displayed sub formulas, and any of the legal operands. That is, to use a parameter, it must first be displayed in the Parameters area; to use a sub formula, it must first be displayed in the Sub Formulas area.
To be valid it must follow the following rules:
It cannot contain the following unsupported characters: ! @ # $ % ^ & {}[] | ' ; : ? <> `~ ,
+, -, *, /, ( ) can only appear once sequentially
( ) must appear as a pair
It cannot contains any spaces
All operators must be used according to the mathematical rules
All included parameters must be displayed in the Parameters area
All included sub formulas must be displayed in the Parameters area
The formula cannot begin or end with any of the following characters: * / + -
|
|
If you use parameters or sub formulas in a gas formula that you have not saved to the system, after you save the formula, when you subsequently access this formula you will see the parameters or sub formulas in their respective areas (but you will not be able to access them via the Folders icon for use in other formulas). |
To define a new formula:
| 1. | From the Option Class dropdown list click Gas Formula. |
| 2. | Click the Gas Formula Builder button. A blank Gas Formula Builder window opens. |
| 3. | In the Formula area, define a name for the formula. |
| 4. | In the yellow textbox define the formula itself. |
|
|
You can only use parameters and sub formulas that are displayed in the page in the relevant areas. |
| 5. | From the currency dropdown list select a currency. |
| 6. | From the unit measurement dropdown list select a unit measurement. |
| 7. | Click the Save Formula button and then click OK. The formula is saved for use by all users, and can subsequently be selected in the Formula dropdown list in the pricing page. |
To edit an existing formula:
| 1. | From the Option Class dropdown list click Gas Formula. |
| 2. | In the Formula dropdown list click an existing formula. |
| 3. | Click the Gas Formula Builder button. The Gas Formula Builder window opens with that formula displayed. |
| 4. | Edit the formula, currency and unit measurement as required. |
|
|
If you edit the name, when you click the Save Formula button the system will not edit the existing formula but rather create a new one leaving the existing formula as it was. Also you can only use parameters and sub formulas that are displayed in the page in the relevant areas. |
| 5. | Click the Save Formula button and then click OK. The edited formula is saved for use by all users, and can subsequently be selected in the Formula dropdown list in the pricing page. |