
This topic deals with working with the generated charts in the Back Testing tool (Using the Back Testing Tool) and the Historical Analysis Page.
To work with the other charts generated by SDX Interest Rates (the market data charts, the payout chart and the risk charts) see Modifying the Market Data Chart, Payout Chart & Risk Chart Displays.
Once the system has generated a chart (whether in the Back testing tool or the Historical Analysis page) it displays:
The plotted data.
A scroller area (at the bottom of the main chart), which is a simplified representation of the entire data set. This area is used by the viewer to move back and forth through the data set.
In the generated chart you can then do any of the following:
Choose which data elements to include in the chart according to your needs.
That is, you can choose which of the elements (in the Historical Analysis charts) or instruments (in the Back Testing tool) to include in the chart.
You do this using the icon next to each element, as seen in Figure 1. Clicking the colored dot next to an element/instrument immediately removes it from the chart, and the dot itself is replaced by an X. Clicking the X immediately returns it to the chart.
| Figure 1: | Choosing Which Instruments to Display in the Back Testing Chart |
Mouse over the chart to see the actual result on each date you point at.
As you move the mouse over the chart, the result for each displayed element is updated and the date range for which the results are shown is displayed. In the Back Testing tool this is shown on the top right of the chart; in the Historical Analysis page this is shown to the left of the chart.
In the Back Testing chart, whether you see the results for a day, week or month depends on the back testing period chosen, the zoom chosen and on the range displayed. However, note that if you see the results for a week or month, the system displays the results for the last day of the period displayed.
In the Historical Analysis chart the results are always shown for a single day.
Zoom in on a period of particular interest.
SDX Interest Rates lets you zoom in on a selected area of a created chart. This is particularly useful when studying a chart that spans a long time period and you would like to see data for a specific section of that period more clearly.
You do this by defining the period to display.
You can do this in a number of ways:
Using the Zoom tool.
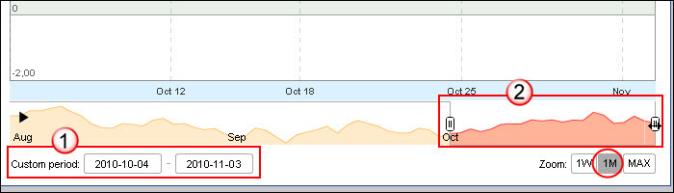
The Zoom tool lets you lets you select a period to display that is measured backwards from the current date. So if the current date is 4 November 2010 and you select 1m you see the period from 4 October 2010 to 3 November 2010.
The actual dates of the period shown is noted in the Custom Period fields (as seen in 1 in Figure 2) and the range of the period selected (relative to the entire back testing period) is indicated in the scroll area (as seen in 2).
Defining the period to display (or zoom in on) directly in the Custom Period fields.
You can define the period to display directly in the Custom Period fields.
Again you can see the period selected relative to the entire back testing period in the scroll area (as seen in 2 in Figure 2).
Defining the area to display in the scroll area itself.
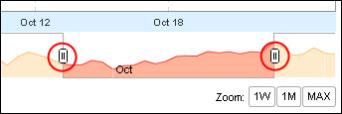
If you have defined a period range, click in between the icons (as seen in Figure 3) and then drag to retain the period size and apply it to a different section of the entire back testing area. Again you see the period displayed in the Custom Period fields.

Figure 3: Dragging the Entire Period to Display
Alternatively, click either or both of the actual scroll icons (as seen in Figure 4) and drag to redefine the zoom period to display.
| Figure 4: | Dragging to Change the Display Period |
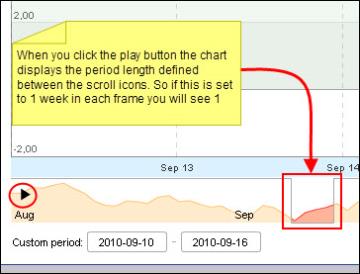
Play through the entire data set. You can instruct the system to automatically scroll over the entire data set displayed in the chart.
You do this by clicking the black play button in the scroller (as seen in Figure 5). As it scrolls through the data set (one day at a time), each time it displays the period defined using the scroll icons.
| Figure 5: | Automatically Play Through the Entire Data Set |